Before you Begin:
This article takes into consideration that you have already performed the following steps:
Installed the solution from the Virtual Solution Center
Added the customer location and devices
Configured or selected all Print Release settings, to include:
Print Release Server URL
Document Accounting Server URL
Preferred Print Release Icon text
Preferred Print Release Icon
Preferred Print Release Icon (when pressed)
Preference for "Delete Confirmation Screen"
Entry of "Jobs per call" number
Configured the Cloud Authentication Client, to include:
Release and Tracking Server Address
Release and Tracking SSL Certificate
Application Access Policy
First Authentication Token
Second Authentication Token
Alternate Authentication Enabled
Auto registration enabled
Configured Background and Idle Screen
Installed Badge Card Reader(s)
Deployed the solution
How to Create a SaaS Print Queue:
Required
Print Release Server address
PCL or PS Universal Print Driver
Note: If you have not yet installed the printer driver, you can download the UPD from the VSC or
support.lexmark.com
.

If the driver has already been installed:
Click Start or
Open Printers and Devices or Devices and Faxes.
Select Add Printer.
If you have just downloaded the driver:
Run the installer.exe file from your computer. Accept the license agreements and setup defaults.
From the Printer Wizard Information dialog, copy (ctrl-c) the path to the Lexmark Universal Print Driver files, or you can later browse to the directory.
On the Add Printer Wizard dialog, click Next.
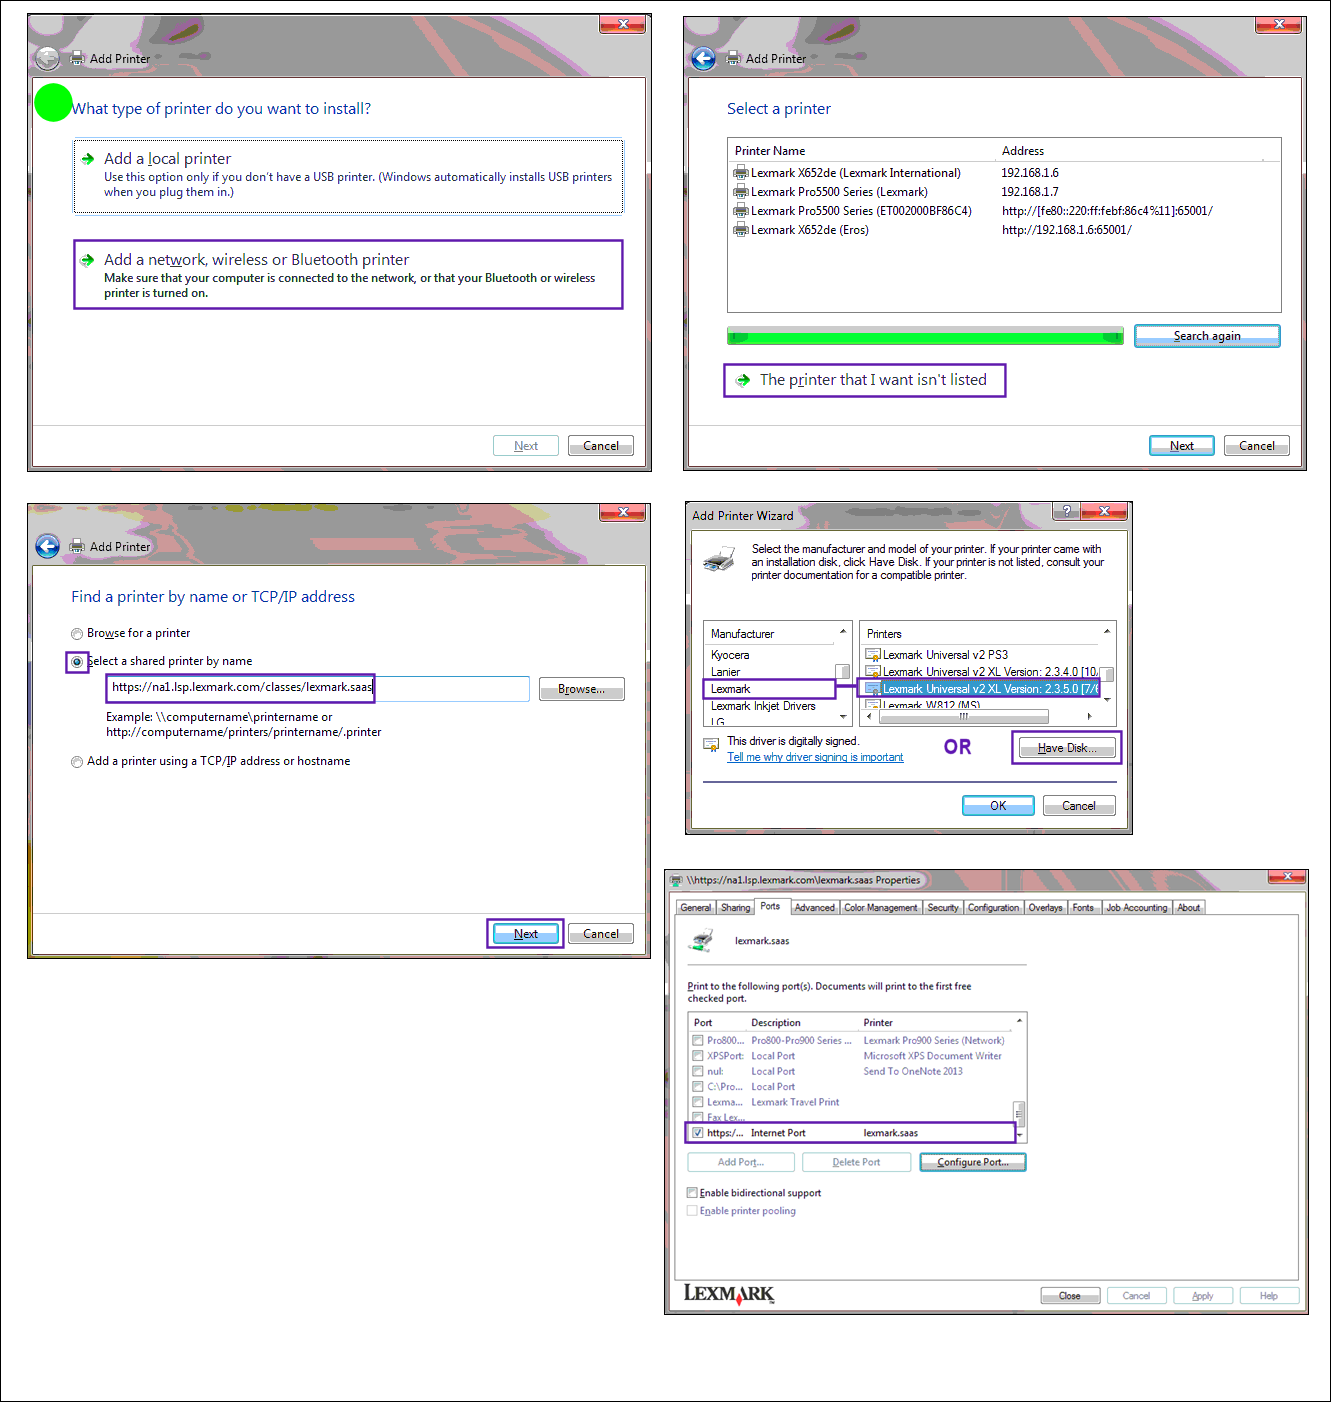
Select "Add a network, wireless or Bluetooth printer."
Choose "Stop Searching", and then select"The printer that I want isn’t listed".
Under "Find a printer by name or TCP/IP address" and c
hoose "Select a shared printer by name", and enter the Print Release server address:
https://lsp.lexmark.com/classes/companyId, where companyId is your assigned ID.https://na4.lsp.lexmark.com/classes/lexmark.saas as one example)
Note:Wait a few minutes for the computer to communicate with the server.
Either locate the Lexmark UPD if the driver is already installed, or when prompted to install the software, select "Have Disk."
In the "Copy manufacturer's files from" field, paste the location of the Lexmark Universal Print Driver files, or click Browse and then navigate to the location of .inf file for the driver.
Click OK, making sure the Lexmark Universal PS3 or XL driver is selected, and then click "Next."
If prompted, select, "Use the driver that is currently installed" or"Keep existing driver", and then click "Next."
Continue to follow the remaining steps as presented by the Add Printer Wizard. For example:
Type a descriptive name for the print queue.
Select whether to use the new print queue as the default.
Print a test page.
Click Finish.
How to Disable Bidirectional Support and Configure Options:
Open Printer Properties for the newly created print queue.
Click on the Ports tab.
Uncheck (remove checkmark) Enable bidirectional support. This feature is not necessary since this print queue will not be communicating directly with the printer.
Click Apply.
Click on the Configuration tab.
Uncheck (remove checkmark) Update Configuration from printer.
Under Configuration Options, place a checkmark next to all of the options. This makes all peripherals and trays accessible to your users for your entire printer fleet.
Click Apply.
Troubleshooting:
If under Ports you see the Descriptionlisted as Standard TCP/IP port, then the port was not created properly.
Delete all jobs from the existing queue.
Remove print queues associated with that port.
Delete the port. More information about this procedure is listed
.
Use the procedure described above to recreate the print queue.
Note:
This procedure may require stopping and starting the print spooler.
Still Need Help?
Have the following available when calling Lexmark Technical Support:
Printer model(s)
Printer serial number
If you need help locating your printer model and serial number,
.
LEGACY ID: HO3907