Cloud-based Native Agent pre-enrollment lets you specify in advance the Lexmark printers that you want to enroll. You only need to enter an enrollment code at the printer. The enrollment code is obtained from the Fleet Management portal for an organization and can be used to enroll all pre-enrolled printers for that organization. The list of pre-enrolled printers can be entered one at a time or imported from a CSV or TXT file. This method is useful for large printer deployments.
Pre‑enroll printers by doing the following:
- Entering their serial number in the Cloud Fleet Management portal
- Obtaining the organization’s enrollment code
- Applying the organization’s enrollment code to the printer, using the control panel or the Embedded Web Server (EWS)
Note: Cloud-based pre-enrollment is supported only in current‑generation IoT-capable Lexmark printers. If enrollment using this method is unsuccessful, then enroll using the Printer Enrollment Tool.
Entering printer serial numbers in the Cloud Fleet Management portal

From the Fleet Management web portal, do one of the following:
- If some printers are already enrolled, then click Agents > Native Agents > Enrollment > Pre‑enroll > Pre‑enroll printers.
- If enrolling printers for the first time, then click Agents > Native Agents > Pre‑enroll Printers.
From the Pre‑enroll Printers dialog, do one of the following:
- Select Manually input serial number, type the printer serial number, and then press Enter.
- Select Import printer serial number from file, and then browse to the CSV or TXT file.
Note: To receive the enrollment code and the complete enrollment instructions using email, type your email address.
Once pre-enrolled, the printer serial number is listed on the Native Agent page with a Printer pre-enrolled icon.
Obtaining the enrollment code
Click Agents > Native Agents > Enrollment > Pre‑enroll.
Copy the organization’s enrollment code.
Note: You can also obtain the enrollment code by clicking the pre‑enrolled serial number. The code can be found in the Printer Information section.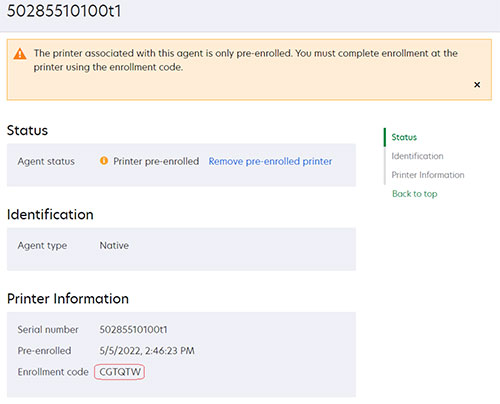
Note: If the Enrollment menu is not visible, or there are no printer serial numbers listed, then no printers have been pre-enrolled. For more information, see Printer‑based enrollment.
Applying the enrollment code to the printer
- Using the control panel
From the printer home screen, touch Settings > Cloud Services > Cloud Services Enrollment
From the Enable communication with Lexmark Cloud Services menu, touch On.
Touch Enroll Printer, and then enter the enrollment code.
Touch OK
- Using the Embedded Web Server
From the Embedded Web Server, click Settings > Cloud Services > Cloud Services Enrollment
Select Enable communication with Lexmark Cloud Services, and then click Save.
Click Refresh until the Enrollment Code field is visible. This may take a few minutes.
In the Enrollment Code field, enter the enrollment code, and then click Enroll Printer.
Notes:
- The enrollment code is case-sensitive.
- The enrollment can be verified from the Cloud Fleet Management portal.
- It may take a few minutes for the printer enroll.